Use Cases
Docs
Blog Articles
BlogResources
Pricing
PricingCreate a Github Stars/Forks Event Dataflow

Contributor, InfinyOn

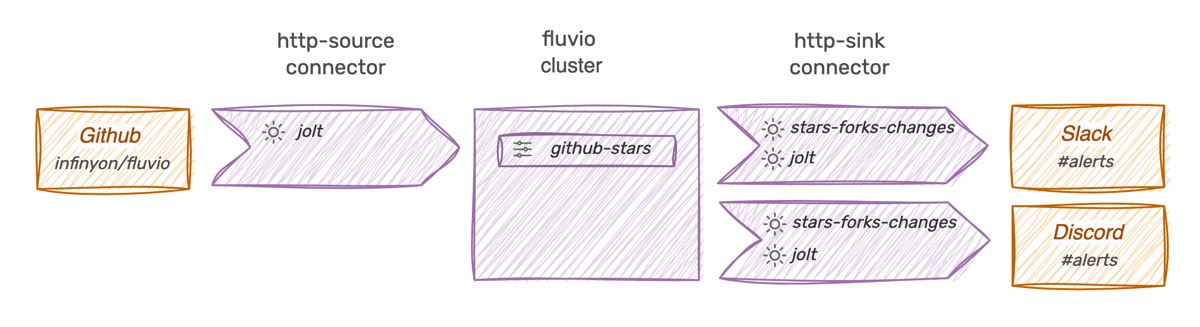
Nothing is more exhilarating than watching the github stars and forks go up on a newly launched github project. But constantly clicking on stars and forks tends to grow old. If you want to get notified in Slack or Discord anytime you receive a new star 🌟 or fork 🎏, this blog is for you!
This blog is a step-by-step tutorial on how to create a dataflow that watches github for changes and notifies you in Slack or Discord.
The blog has an Advanced Topics optional section. There, we’ll show you how to build your own stars/forks SmartModule instead of using the one from the Hub.
Let’s get started.
Requirements
This blog is a step-by-step tutorial producing a fully functional InfinyOn Cloud dataflow. If you want to follow along, there are there are a few prerequisites:
- Fluvio CLI running on your local machine.
- An account on InfinyOn Cloud.
- Admin access to Slack or Discord to generate a webhook API key.
Optional: If you want to access Github more often, you’ll need to generate a token, which also requires admin access.
Create a Dataflow
In fluvio, a dataflow intermediating data exchanges between services requires a source and a sink connector. In our use case, we’ll need a source connector that periodically queries github and write to a topic and a sink connector that reads from the topic and notifies github/discord when it detects a change. So, we’ll tackle this problem in two parts:
Finally, we’ll build a Discord Consumer, which is virtually identical to the Slack consumer.
Build a Github Producer
Source connectors are responsible for reading from external services and publishing the results to a fluvio topic. For our use case, we’ll use the http-source connector.
Before we start, let’s examine the data we get from github and determine what we want to write to the topic.
$  curl https://api.github.com/repos/infinyon/fluvio
{
  "id": 205473061,
  "node_id": "MDEwOlJlcG9zaXRvcnkyMDU0NzMwNjE=",
  "name": "fluvio",
  "full_name": "infinyon/fluvio",
  "owner": {
    "login": "infinyon",
    "id": 52172389,
    ...
  },
  ...
  "stargazers_count": 1754,
  "forks_count": 137,
  ...
}
The query response returns a lot of data, but we only need a couple of fields, so we want to:
- Discard all fields other than
stargazers_countandforks_count. - Rename the fields to
starsandforks, for better readability.
On each query response, we write an event into the data stream:
{ "stars": 1890, "forks": 142 }
{ "stars": 1891, "forks": 143 }
Define the http-source Smart Connector
At InfinyOn, we call the connectors Smart to emphasize that they accept transformations. Let’s go over to the http-source connector to see how to set things up.
A quick look at the https-source connector documentation shows that the connector manages the request and response and hands off the data to transformation to smartmodules for additional processing. Quick note for beginners; SmartModules are custom programs compiled to WebAssembly that shape data before sending it to the data stream.
At first, sight, performing data transformations may feel like a lot of work, but in reality, it’s not too bad. The InfinyOn team built several smartmodules that we can download from Smartmodule Hub and use DSL to perform most of the work. For complex transformations, we can develop our own smartmodules and publish them to the Hub for sharing. The cool part is that we can mix and match public and custom smartmodules and seldom need to start from scratch.
Ok then, open an editor, create the following configuration file, and name it github.yaml :
apiVersion: 0.1.0
meta:
  version: 0.2.5
  name: github-stars-inbound
  type: http-source
  topic: github-stars
http:
  endpoint: 'https://api.github.com/repos/infinyon/fluvio'
  method: GET
  interval: 300s
transforms:
  - uses: infinyon/[email protected]
    with:
      spec:
        - operation: shift
          spec:
            "stargazers_count": "stars"
            "forks_count": "forks"
Below is a brief description of the most relevant fields:
- meta - for connector and data streaming information
type- connector typetopic- the target data streaming topic
- http - for connector-specific configurations
endpiont- endpoint to queryinterval- the frequency of the query5 minutesto avoid the github rate-limit threshold (without a token)
- transforms for smarmodule definitions
jolt- to expressjsontransformations inDSL.
The connector users jolt smartmodule for the transformation. As jolt is available in the Hub, we need to download it to the cluster:
$ fluvio hub sm download infinyon/[email protected]
downloading infinyon/[email protected] to infinyon-jolt-0.3.0.ipkg
... downloading complete
Great, we are ready to provision our first connector.
Run the connector in InfinyOn Cloud
We need Fluvio CLI to provision the connector in InfinyOn Cloud:
$ fluvio cloud connector create -c github.yaml
connector "github-stars-inbound" (http-source) created
Let’s check the health of the connector:
$ fluvio cloud connector list
 NAME                  TYPE         VERSION  CDK  STATUS   LOG-LEVEL
 github-stars-inbound  http-source  0.2.5    V3   Running  info
The connector invokes a get request that generates a record, which it sends to jolt for the transformation, and it writes the result to the github-stars topic.
Let’s check what’s in the topic:
$ fluvio consume github-stars -B
Consuming records from 'github-stars' starting from the beginning of log
{"stars":1890,"forks":143}
⠂
Great the producer is up and running, it’s time to build the sonsumer.
Build a Slack Consumer
The Slack consumer reads from the data stream, detects if there is a change in the number of forks or stars, and pushes a notification to Slack. We’ll use the [http-sink] connector and a couple of smartmodules to do the job.
InfinyOn offers several Smartmodule that operate generic json fields. However, we want to build cusotm logic that generates a string with emojis for our Slack channel. So, let’s go ahead and build our Smartmodule one.
Download the stars/forks smartmodule from Hub
Download the pre-built version from the Hub. If you prefer to build your own, checkout the Advanced Topics section:
$ fluvio hub sm download infinyon-labs/[email protected]
$ fluvio sm list
  SMARTMODULE                              SIZE
  infinyon/[email protected]                      612.7 KB
  infinyon-labs/[email protected]  52.4 KB
This smartmodule is downloaded from infinyon-labs, used for tutorial projects. InfinyOn supports multiple global identifiers, including custom ones, enabling you to build and publish your own smartmodules.
Setup Slack Webhook
The last piece of the puzzle is the Slack webhook. Check out Incoming Webhooks on Slack on how to set it up.
Slack requries that we send the notification in a specific format:
POST https://hooks.slack.com/services/T00000000/B00000000/XXXXXXXXXXXXXXXXXXXXXXXX
Content-type: application/json
{
    "text": "Hello, world."
}
In this example we’ll chain stars-forks-changes smartmodule with jolt to rename the result to text as required by Slack syntax.
Define the http-sink Smart Connector
Create the following configuration file, and name it slack.yaml :
apiVersion: 0.1.0
meta:
  version: 0.2.5
  name: slack-stars-outbound
  type: http-sink
  topic: github-stars
  secrets:
    - name: SLACK_TOKEN
http:
  endpoint: "https://hooks.slack.com/services/${{ secrets.SLACK_TOKEN }}"
  headers:
    - "Content-Type: application/json"
transforms:
  - uses: infinyon-labs/[email protected]
    lookback:
      last: 1
  - uses: infinyon/[email protected]
    with:
      spec:
        - operation: shift
          spec:
            "result": "text"
Next, we’ll need to upload SLACK_TOKEN to InfinyOn Cloud.
Add your Slack secret to InfinyOn Cloud
InfinyOn Cloud implements a secure vault for storing and referencing secrets.
Grab your slack webhook token to write it to InfinyOn Cloud:
$ fluvio cloud secret set SLACK_TOKEN T00000000/B00000000/XXXXXXXXXXXXXXXXXXXXXXXX
Run the connector in InfinyOn Cloud
Let’s run the connector:
$ fluvio cloud connector create -c slack.yaml
connector "slack-stars-outbound" (http-sink) created
Check the logs to ensure it has been provisioned:
$ fluvio cloud connector logs slack-stars-outbound
Your end-to-end dataflow up and running;
- the sink connector reads the last record from
github-stars - the smartmdule that detects changes and formats the output for Slack
Let’s produce a fake record to test it:
$ fluvio produce github-stars
> {"stars":1891,"forks":144}
Ok
Awesome! The Slack bot sent us an alert:
my-stars-bot <APP>  12:35 PM
🎏 144
🌟 1891```
🎉 Congratulations!
The following section focuses on Discord.
Build a Discord Consumer
In fluvio, you can deploy multiple connectors reading form the same stream in parallel. Let’s create a Discord connector tat reads from the same topic and notifies Discord. Check out Discord Webhooks on how to create one.
Create the following configuration file, and name it discord.yaml :
apiVersion: 0.1.0
meta:
  version: 0.2.5
  name: discord-stars-outbound
  type: http-sink
  topic: github-stars
  secrets:
    - name: DISCORD_TOKEN
http:
  endpoint: "https://discord.com/api/webhooks/${{ secrets.DISCORD_TOKEN }}"
  headers:
    - "Content-Type: application/json"
transforms:
  - uses: infinyon-labs/[email protected]
    lookback:
      last: 1
  - uses: infinyon/[email protected]
    with:
      spec:
        - operation: shift
          spec:
            "result": "content"
This configuration is similar to the Slack configuration, except for the name, endpoint and jolt transformation. Discords expects the json field to be named content instead of text.
Add your discord webhook token to InfinyOn Cloud:
$ fluvio cloud secret set DISCORD_TOKEN <webhook-token>
Start the connector:
$ fluvio cloud connector create -c discord.yaml
connector "discord-stars-outbound" (http-sink) created
Your end-to-end dataflow is up and running.
Let’s produce a fake record to test it:
$ fluvio produce github-stars
> {"stars":1892,"forks":145}
Ok
If the webhooks has been configured correctly the alert is now published to Discord.
🎉 Congratulations! You’ve created two end-to-end dataflows that are continuously monitoring github for changes.
Advanced Topics
In this section, we’ll cover a couple of advanced topics. The first one is catered toward developers and provides instructions on how to build your own smartmodule for start/forks. The second shows you how to apply a Github Token to increase the read frequency from github.
Build a custom stars/forks smartmodule
We’ll use Smartmodule Development Kit (smdk) to build, test, and deploy our smartmodule to the cluster.
Install smkd
SMDK is a separate CLI for Smartmodule developers, let’s install it:
$ fluvio install smdk
Generate a new project
Run the generator to create a filter-map smartmodule called stars-forks-changes:
$ smdk generate stars-forks-changes
Generating new SmartModule project: stars-forks-changes
✔ 🤷   Will your SmartModule use init parameters? · false
✔ 🤷   Will your SmartModule be public? · false
✔ 🤷   Which type of SmartModule would you like? · filter-map
[1/7]   Done: .gitignore
[2/7]   Done: Cargo.toml
[3/7]   Done: README.md
[4/7]   Done: SmartModule.toml
[5/7]   Done: rust-toolchain.toml
[6/7]   Done: src/lib.rs
[7/7]   Done: src
Note You may be prompted to add a group a globally unique namespace that you’ll need to load to cluster and publish to Smartmodule Hub. In this blog we’ll skip publishing to Hub.
Navigate to the project directory:
$ cd stars-forks-changes
Add the custom logic
Replace the content of src/lib.rs with our custom logic:
use std::sync::atomic::{AtomicU32, Ordering};
use fluvio_smartmodule::{smartmodule, Record, RecordData, Result};
use serde::{Deserialize, Serialize};

// use u32 to represent the metric
type Metric = u32;
type AtomicMetric = AtomicU32;

/// Incoming record from Github
#[derive(Default, Deserialize)]
struct GithubRecord {
    stars: Metric,
    forks: Metric,
}

/// Outgoing record
#[derive(Default, Serialize)]
struct GithubOutgoing {
    result: String,
}

/// Accumulator for stars and forks
static STARS_FORKS: StarsForks = StarsForks::new();

/// Use Atomic to update internal state
#[derive(Default, Debug, Deserialize)]
struct StarsForks {
    stars: AtomicMetric,
    forks: AtomicMetric,
}

impl StarsForks {
    const fn new() -> Self {
        Self {
            stars: AtomicMetric::new(0),
            forks: AtomicMetric::new(0),
        }
    }

    fn get_stars(&self) -> Metric {
        self.stars.load(Ordering::SeqCst)
    }

    fn set_stars(&self, new: Metric) {
        self.stars.store(new, Ordering::SeqCst);
    }

    fn get_forks(&self) -> Metric {
        self.forks.load(Ordering::SeqCst)
    }

    fn set_forks(&self, new: Metric) {
        self.forks.store(new, Ordering::SeqCst);
    }

    fn set_both(&self, github_record: GithubRecord) {
        self.set_stars(github_record.stars);
        self.set_forks(github_record.forks);
    }

    // generate emoji string based on the new stars and forks
    fn update_and_generate_moji_string(&self, new: &GithubRecord) -> Option<GithubOutgoing> {
        let current_stars = self.get_stars();
        let current_forks = self.get_forks();

        if new.stars != current_stars && new.forks != current_forks {
            // if both stars and forks are changed, generate new emoji on prev stats
            let emoji = GithubOutgoing {
                result: format!("🎏 {} \n🌟 {}", new.forks, new.stars),
            };
            self.set_forks(new.forks);
            self.set_stars(new.stars);
            Some(emoji)
        } else if new.forks != current_forks {
            // if only forks are changed, generate new emoji on prev stats
            let emoji = GithubOutgoing {
                result: format!("🎏 {}", new.forks),
            };
            self.set_forks(new.forks);
            Some(emoji)
        } else if new.stars != current_stars {
            let emoji = GithubOutgoing {
                result: format!("🌟 {}", new.stars),
            };
            self.set_stars(new.stars);
            Some(emoji)
        } else {
            // no changes
            None
        }
    }
}

#[smartmodule(look_back)]
pub fn look_back(record: &Record) -> Result<()> {
    let last_value: GithubRecord = serde_json::from_slice(record.value.as_ref())?;

    STARS_FORKS.set_both(last_value);

    Ok(())
}

#[smartmodule(filter_map)]
pub fn filter_map(record: &Record) -> Result<Option<(Option<RecordData>, RecordData)>> {
    let new_data: GithubRecord = serde_json::from_slice(record.value.as_ref())?;

    if let Some(emoji) = STARS_FORKS.update_and_generate_moji_string(&new_data) {
        let output = serde_json::to_vec(&emoji)?;
        Ok(Some((record.key.clone(), output.into())))
    } else {
        Ok(None)
    }
}
The code reads the github records from the data stream, builds an accumulator, and generates a formatted string if the number of stars or forks has changed. It also uses a look_back API to initalize the internal state from the last value.
This project is also available for download on github.
$ smdk build
Let’s do a quick test; save the following in a file test-data.txt:
{"forks":143,"stars":1890}
{"forks":143,"stars":1890}
{"forks":143,"stars":1890}
{"forks":143,"stars":1889}
{"forks":143,"stars":1889}
{"forks":144,"stars":1889}
{"forks":144,"stars":1889}
{"forks":145,"stars":1890}
{"forks":146,"stars":1890}
{"forks":146,"stars":1891}
Run the test:
$ smdk test --file ./test-data.txt --lookback-last 1 --record '{"forks":143,"stars":1890}'
{"result":"🌟 1889"}
{"result":"🎏 144"}
{"result":"🎏 145 \n🌟 1890"}
{"result":"🎏 146"}
{"result":"🌟 1891"}
Great! Our smartmodule produces a json record result: “…” on changes, and ignores everything else.
Load the smartmodule to the cluster:
$ smdk load
Loading package at: ~/stars-forks-changes
Found SmartModule package: stars-forks-changes
loading module at: ~/stars-forks-changes/target/wasm32-unknown-unknown/release-lto/stars_forks_changes.wasm
Trying connection to fluvio router.infinyon.cloud:9003
Creating SmartModule: stars-forks-changes
Let’s double-check that the smartmodule is indeed on the cluster:
$ fluvio sm list
  SMARTMODULE                              SIZE
  infinyon/[email protected]                      612.7 KB
  <group>/[email protected]        52.4 KB
🎉 Congratulations, you built your first smartmodule! We’ll leave it as an exercise to replace the pre-built smartmodule with your own. It’s simple: delete the existing connector and re-create it with the updated configuration file.
Increase github refresh interval (optional)
Github rate-limit can be extended from 60 to 5000 queries per hour by creating an application token. Check out github documentation on Access Tokens.
Let’s update the github.yaml configuration with the access token:
apiVersion: 0.1.0
meta:
  version: 0.2.5
  name: github-stars-inbound
  type: http-source
  topic: github-stars
  secrets:
    - name: GITHUB_TOKEN
http:
  endpoint: 'https://api.github.com/repos/infinyon/fluvio'
  method: GET
  headers:
  - 'Authorization: token ${{ secrets.GITHUB_TOKEN }}'
  interval: 30s
transforms:
  - uses: infinyon/[email protected]
    with:
      spec:
        - operation: shift
          spec:
            "stargazers_count": "stars"
            "forks_count": "forks"
Note, with the access token, we can increse the query interval to 30 seconds.
Add the access token to InfinyOn Cloud :
$ fluvio cloud secret set GITHUB_TOKEN <access-token>
To refresh, let’s delete & create the connector again:
$ fluvio cloud connector delete github-stars-inbound
$ fluvio cloud connector create -c github.yaml
Conclusion
This blog taught us how to build dataflow with Fluvio via InfinyOn Cloud. Now that we built and published all the smartmodules, creating a new dataflow that reads external sources and notifies Slack or Discord is a 2 step process:
- Create and run the
http-sourceconnector - Create and run the
http-sinkconnector
All the data magic is done via smartmodules. As your custom smartmodule library grows, adding new dataflows becomes a trivial exercise.